












Shrinkage and Print Placement After the First Wash

A print can look perfectly centered when it leaves your heat press and appear too high, low, or off-center after the first wash. The transfer usually has not moved—the garment around it has changed shape.
For a small apparel business, controlling that change starts with understanding fabric shrinkage, using repeatable placement references, and testing each blank before committing to a production run.
Why a Print Appears to Move After Washing
DTF transfers bond to the garment fibers during pressing. Once correctly applied, the print should not slide around the shirt in the wash. However, the fabric can contract in length, width, or both, changing the print's position relative to the collar, side seams, and hem.
For example, a design placed three inches below the collar may still be attached to the same fibers after washing. But if the upper chest contracts or the collar changes shape, that distance can become smaller. The design then looks higher even though the transfer itself did not travel.
Shrinkage is not always uniform. A shirt may lose more body length than width, one side seam may twist forward, or the collar may tighten while the chest changes very little. These differences are why a single shrinkage percentage printed in a product description cannot fully predict final placement.
Garment variables that affect the result
- Fiber content: Cotton generally responds differently to washing and drying than polyester or blended fabrics.
- Fabric construction: Knit density, yarn type, weight, and finishing all influence dimensional change.
- Garment treatment: Preshrunk does not mean shrink-proof. It means the fabric or garment has already received a process intended to reduce later shrinkage.
- Cut and sewing: Side-seamed, tubular, oversized, fitted, and cropped shirts may distort in different ways.
- Wash routine: Water temperature, dryer heat, cycle length, and repeated drying can change the final dimensions.
Do not assume two shirts with the same fiber-content label will behave identically. If you are comparing brands or styles, test the exact SKU and color you intend to sell. You can source blank apparel priced near cost and run a controlled sample before taking a large order.
Measure Shrinkage Before Setting Final Placement
A wash test gives you better information than guessing. Test at least one garment from the actual style, size, and color in your order. Dark and light colorways can go through different manufacturing processes, so treat a color change as a reason to verify the result again.
A practical wash-test process
- Lay the unwashed shirt flat without stretching it.
- Measure body length from the high point of the shoulder to the bottom hem.
- Measure chest width from armpit to armpit.
- Record the collar-to-print distance, print centerline, and distance from the print to each side seam.
- Press the transfer using the recommended time, temperature, and pressure.
- Let the garment rest and record its measurements again. Press heat can cause an initial dimensional change before laundering.
- Wash and dry the shirt using the care method you plan to recommend to customers.
- Lay it flat, reshape it without stretching, and repeat every measurement.
Calculate shrinkage with this formula: (before measurement − after measurement) ÷ before measurement × 100. If a 28-inch body measures 27.2 inches after washing, the length change is about 2.9%.
That percentage is useful for comparing blanks, but it should not be used to mathematically shift every design. Shirts do not always contract evenly from top to bottom. Your physical collar-to-print measurements are the better guide for production placement.
| Observed change | What the customer may see | Production response |
|---|---|---|
| Body length decreases | Print appears closer to the hem or larger on the shirt | Evaluate the full front visually after washing |
| Upper chest contracts | Print appears closer to the collar | Increase the initial collar offset slightly if testing supports it |
| Width decreases | Print fills more of the chest | Consider a narrower transfer for that blank |
| Side seam twists | Centered print appears crooked | Change blanks or center using the true body panel |
| Collar distorts | Placement appears uneven at the top | Use stable seam references and inspect the blank first |
Build a Repeatable DTF Placement System
Consistency comes from fixed reference points, not from eyeballing each shirt. Fold the garment lightly to identify its vertical center, or use a shirt ruler, laser, platen guide, or alignment board. Make sure the sleeves and side seams are sitting naturally before deciding that the body is centered.
For a standard front print, measure down from the bottom of the collar seam rather than the loose edge of the ribbed collar. Ribbing can curl, stretch, or vary in height. Record placement as a production specification such as “top of design 3 inches below bottom collar seam, centered on body panel.”
Keep separate specifications for each garment category. Adult, youth, toddler, women’s fitted, oversized, and cropped blanks do not share one universal placement. The adult, youth, and toddler print size chart provides practical starting dimensions, but your wash-tested blank should determine the final choice.
Scale the art for the final garment, not just the mockup
If a shirt loses width, the same transfer occupies a larger percentage of the chest after washing. A design that already runs close to the side seams can look crowded after the first wash. Leave intentional breathing room, especially on smaller sizes and fitted cuts.
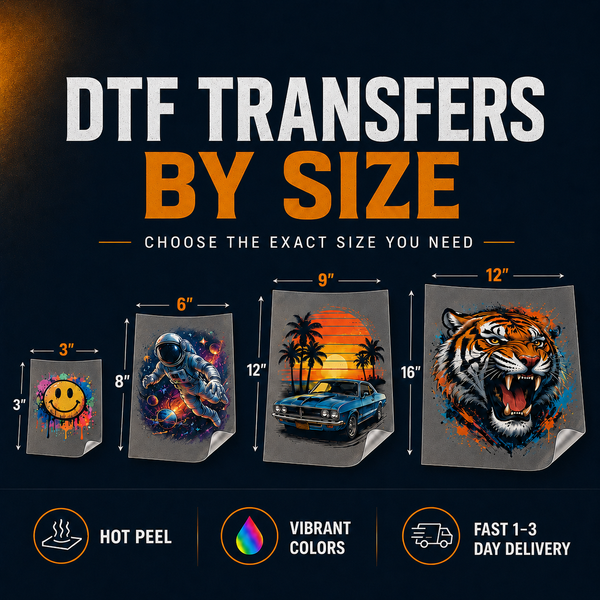
Use DTF transfers ordered by size when you need defined dimensions for a short run, replacement, or placement test. For multi-size production, you can build a DTF gang sheet online with separate adult, youth, and pocket-size versions rather than forcing one transfer width onto every garment.
Label each transfer size in your production notes and group garments before pressing. This prevents an adult design from landing on a youth shirt and makes collar offsets easier to maintain through the run.
Pressing Choices That Protect Alignment
Some placement problems begin at the press rather than in the washer. Excessive heat, long dwell time, uneven pressure, or moisture in the garment can temporarily or permanently distort the fabric.
Pre-press only as needed to flatten the printing area and remove moisture. After the pre-press, let the garment settle flat before aligning the transfer. If you place the design while the fabric is stretched over a platen or pulled tightly by a threadable setup, it may contract around the transfer when removed.
- Load the shirt without stretching the neckline or chest.
- Smooth wrinkles outward while keeping the fabric relaxed.
- Confirm the centerline after the pre-press.
- Follow the specified time, temperature, pressure, and peel instructions.
- Use a cover sheet for the finishing press when directed.
- Allow the shirt to cool flat before folding or stacking it.
Bear Transfers hot-peel transfers include a 100+ wash guarantee when applied and cared for correctly, but transfer durability and garment shrinkage are separate issues. A durable print can remain firmly bonded while the shirt changes dimensions around it.
Before approving a new transfer and blank combination, a DTF and UV DTF sample pack can help you check application, finish, and handling. For production artwork that is already nested to your specifications, you can also upload a ready-made gang sheet.
Turn Wash Testing Into a Production Standard
Create a simple record for every blank you sell regularly. Include the supplier SKU, color, size tested, unwashed measurements, post-press measurements, washed measurements, dryer method, transfer size, and placement offset. Add front and back photos with a ruler visible when possible.
Repeat the test when a supplier changes the garment specification, you receive a noticeably different batch, or customer feedback suggests a new fit issue. Also retest after changing press equipment or settings.
Give customers clear care instructions: wash inside out, use cold or cool water, avoid bleach and fabric softener, and tumble dry low or hang dry when practical. Care instructions cannot eliminate all shrinkage, but they help reduce heat stress on both the fabric and decoration.
Finally, photograph the washed sample—not only the unwashed press sample. That image shows how the product is likely to look in normal use and helps you catch a design that feels too large, high, or crowded before listings and customer orders go live.
FAQ
Should I prewash every shirt before applying a DTF transfer?
Usually not. Prewashing adds labor and can complicate inventory, but it may make sense for premium one-off work or garments known to shrink significantly. Wash-test one sample from the exact blank first, then choose a consistent policy.
Does the DTF transfer shrink with the shirt?
The transfer may flex with the fabric, but it does not necessarily contract at the same rate. Proper application and a suitable design size help the finished decoration remain comfortable and visually balanced.
How far below the collar should a front print start?
There is no universal measurement for every size and style. Use a category-specific starting point, then confirm it on the actual garment before and after washing.
Why does a centered print look crooked after washing?
The shirt may have twisted seams, uneven panel shrinkage, or collar distortion. Compare the washed side seams and body centerline before assuming the transfer was applied incorrectly.
Standardize your tested sizes and placements, then build your next DTF gang sheet online for efficient production.